
What is an issue?
An issue represents a problem or anomaly spotted in a file, which needs to be addressed. By creating an issue, users can document the problem and collaborate with others in resolving it.
Typical examples of issues in logistics operations:
- 📦 Damage found on cargo, a container, or packaging
- ❓ Missing cargo or items that don't match what was expected
- 🔢 Mismatched data, such as a wrong seal number, license plate, or reference

Whether an operator spots something wrong on the floor, or someone in the office notices a problem while reviewing a file on the platform, opening an issue is the best way to make sure the problem is identified, assigned, and on the path to be resolved efficiently.
Issue Management in 3 steps
- 📱 Log it from the mobile app: Operators can create an issue the moment they spot a problem, at any time, using the Create issue button that is always visible on the app screen.
- 💻 Coordinate it from the office: All issues appear on the Issues page of the web platform. There you can assign users, link files, chat, and follow up on the status.
- 🔍 Keep it auditable and traceable: Every action, message, and decision is recorded in the issue's activities log and stays linked to the related files. When the issue is closed, the full history is preserved.
How to Create an Issue
You can create an issue from the mobile app (📱) or from the web platform (💻):
📱 1. Create an Issue with the Create issue button
The mobile app has a Create issue button that is always visible on the screen. This means your operators can log an issue at any moment, including in the middle of performing a workflow, without having to finish or leave what they are doing.
-
Tap the (+) button on your screen
-
Select "Create an issue"
-
Fill in your short description (alongside you'll have your reference)
-
Feel free to add a detailed description
-
Assign other users to collaborate.
-
Save the issue.
📱 To see the issues you have submitted from the mobile app, go to the menu icon ☰ and, below 'Advanced', select 'Submitted issues'.
You can also create an issue from this menu:
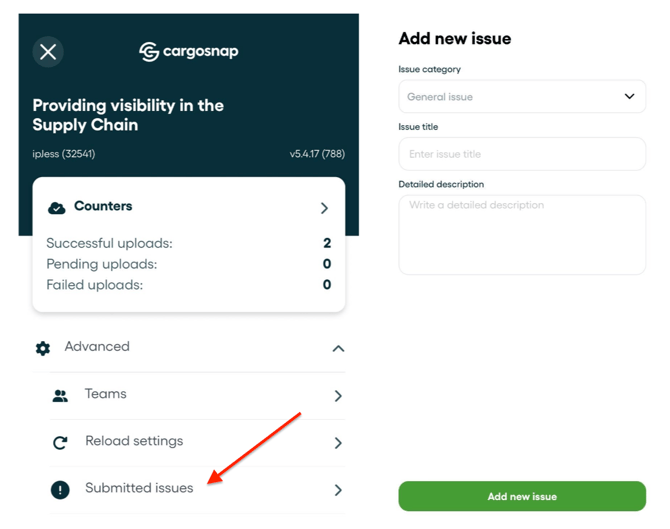
Once submitted, the issue is immediately available on the Issues page of the web platform, where the office team can assign users and link the issue to files.
📱 2. Create an Issue automatically with a Workflow action
With this option, an issue is created automatically every time a specific workflow is completed on the mobile app. Imagine your inspector reports damage by performing the steps of a workflow: by the end of it, an issue is created without any extra action from the inspector.
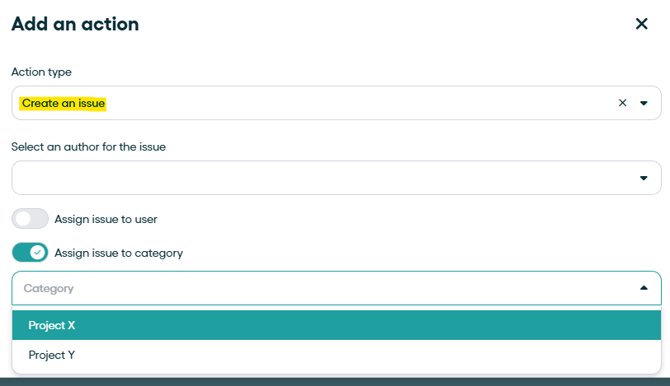
To set this up, go to the specific workflow on the web platform and edit it. After the structure of the steps, click Add an action and select Create an issue.

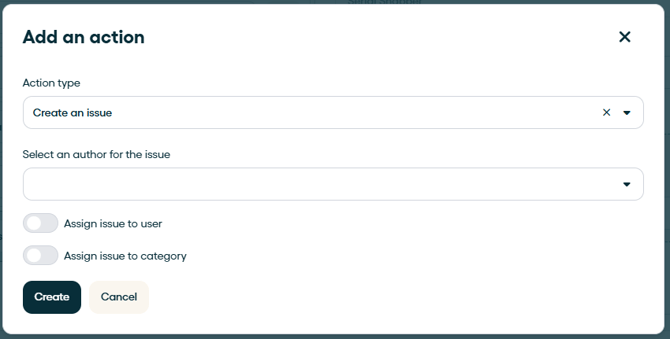
In this action, you can set:
- Author: who's in charge of the issue.
- Assign to a user: who's involved in getting the issue solved.
- Assign to a category: if the issue falls under a particular project, label, or priority.
☝️ Note: Although the issue is created from a workflow performed on a mobile device, this configuration can only be set on the web platform.
💡 What's the difference between options 1 and 2?
The Create issue button is used by the operator whenever they decide a problem needs to be reported. The Workflow action is configured once by an admin and creates an issue automatically every time that workflow is completed.
💻 3. Create an Issue from a File:
If you encounter an issue while reviewing a file:

-
Click the [...] in the top right corner of your file.
-
Click the "Create new Issue" button.
-
Provide a short description of the issue (as simple as a 'title' to your issue).
-
Feel free to add a detailed description.
-
Assign other users to collaborate.
-
Save the issue.
The issue is automatically linked to the file it was created from.
💻 4. Create an Issue from the Issues Overview Page:

-
Navigate on top of your screen to the Issues tab.
-
Click on the "Create New Issue" button.
-
Fill in the issue details.
-
Optionally, link the issue to relevant files.
-
Assign users to work on the issue.
-
Save the issue.
Note that after an issue is created, you can update the title, details, and assignees, so feel free to create an issue, even if you do not have all of the details at hand.
💡 Suggestion: thinking strategically to solve problems, your short description could be What is the situation, the detailed description could elaborate on When, Where, Why and How and, by assigning users, you have Who should be involved. (5W1H Model)
Coordinating and resolving Issues
All issues, regardless of how they were created (mobile app or web platform), are managed on the Issues page of the web platform.
Assigning users and notifications
You can assign one or more users to an issue so they can contribute to resolving it.
📧 Notifications are sent by email only, and only when a user is assigned to an issue. Other activity on the issue, such as new chat messages, updates to the details, or status changes, does not send notifications. To follow up on that activity, visit the issue on the Issues page.
Chatting on an Issue
Each issue has its own chat, so everyone involved can discuss the problem and share updates in one place, instead of scattered across emails or messaging apps.
Linking Issues to Files
-
One Issue, Multiple Files: You can link multiple files to a single issue if the same issue applies to them.

-
Multiple Issues, One File: A file can be linked to multiple issues if it is related to different issues.

Tracking the Status of an Issue
Each issue in the platform can be tracked by its status:
-
Open: The issue is still under review and resolution.
-
Closed: The issue has been resolved.

To check the current status of an issue or participate in the activities log, visit the Issues page.
Auditability and traceability
Every issue keeps an activities log, a record of everything that happened to the issue: actions taken, chat messages, and decisions made by the people involved.
- The activities log stays linked to the issue and to its related files.
- When an issue is closed, its full history is preserved and remains available for consultation.
This makes it easy to answer questions like "what happened, who was involved, and how was it solved?", whether for internal reviews, customer claims, or audits.
Categorizing your Issues
Managing all your tasks in a single, unstructured list—with no separation by project, priority, or team—can quickly become overwhelming and inefficient. That’s why categories are essential: they bring structure, clarity, and control to your issue management flow.
1. Create and manage your Issue categories
To begin, navigate to the Issue Categories tab under your Company Settings.
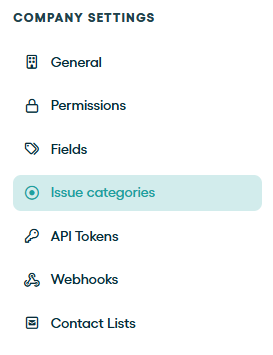
☝️ Note: You must have an License Admin role to manage issue categories.
Click "Create category" to name a category according to your needs, whether it's based on a project, type of issue, event, or any other relevant label.
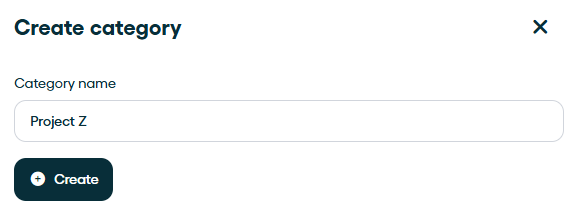
Each issue can be assigned to one category. If no category is selected, the issue will automatically be placed in the system-wide "Default" category. This ensures that every issue is accounted for, even if categorization hasn't been configured yet.

Using Categories on the Issues Page
Once categories are set up, you can group and filter issues by category directly on the Issues page.
This makes it easier to manage large volumes of items and helps teams focus on what matters most, reducing noise and improving response times.
Automatically assigning a category to an issue
If you use the Create an issue workflow action, you can also pre-assign a category during the setup. This ensures that issues created through mobile workflows are immediately organized and ready for follow-up.
By organizing occurrences into meaningful categories, teams can work more efficiently, automate processes with precision, and maintain data integrity. It's a simple yet powerful way to make issue management smarter and more scalable! 🚀